by Juliet Rich WordPress can do really weird and obnoxious things with blank lines. It will add them when you don’t want them, and more often, strip them out when you do want them. No matter how many times and ways you tell it — blank line, blank line!! — as soon as you hit that ‘Preview’ button, they’re gone.
What theme you’re using and what plugins you have installed can also affect it. Switching from Visual to Text editor can screw it up. If you have a plugin that gives you more controls in TinyMCE (the visual editor), that may make things easier or harder!
Here’s what worked for me. It should work most of the time. So, try it out, and my fingers are crossed for you.
Just add the HTML code for a blank space to each line you want blank.
That will trick WordPress into giving you a non-blank line with a blank space. So it’s blank.
Never has nothingness been so frustrating!
by Juliet Rich Imagine if you will, the equivalent of a restaurant or a bookstore framing their first ever dollar they made.

When I gave Amazon my bank account info and it triggered a payment to me (rather than waiting for the check threshold, which is 10x higher), it turned it into real money. Real money that’s mine. Did I mention? Money!

This deposit is solely from my trivia book and still doesn’t cover what I paid for the, er, cover. (The cover was inexpensive, btw, and TOTALLY worth it.) The trivia book was my first book on Amazon and it’s very much a learning experience. I’m still using it to test things out. For example, the new Kindle Countdown Deals program.
I look forward to that Amazon kitteh giving me more money in the future. :D
You May Also Want to Read…
Amazon KDP Help – Getting Paid
by Juliet Rich I found it was easier to organize and visualize what I needed to do to publish an ebook if I made a checklist. It’s a good way of checking on my progress, and of ensuring that I don’t forget something.
One good thing about this checklist is that some of the steps don’t need to be done in order. I can work on them simultaneously with other steps, or I can jump around and tackle whichever one I’m in the mood for that day.
If you adopt this checklist for yourself, I encourage you to adapt it. Tweak it so it suits you.
- Come up with a good title
- My book What Should I Write About? can help you with that.
- Choose a pen name (optional)
- Amazon lets you use multiple pen names under one account.
- Commission a cover
- Or create a cover if you’re good at that.
- Write the book
- Yes, just that simple! ‘Write the book’ :)
- Format the book
- If you’re submitting to Smashwords and Kindle, you’ll have to do this twice.
- Pick categories
- Drill down as far as you can go. Choose relevant categories.
- Pick keywords
- Amazon doesn’t use tags anymore, but the keywords factor into the search engine algorithm. Somehow.
- Write summary blurb
- You’ll probably want a short blurb and a long blurb.
- Decide on price
- My current strategy is to start at $0.99 and raise it bit by bit.
- Upload to Amazon KDP Publishing
- It’s a real book now!
- Enroll in KDP Select (optional)
- For more information, see “Is Amazon’s KDP Select Worth It?”
- Create a spreadsheet to keep track of costs and sales
- How else to tell if you’re making money?
- Create a good author page
- Let readers know you’re a real person with something worth listening to.
- Create a website (optional)
- If this idea freaks you out, start with a Facebook page. Or skip it.
- Marketing
- That gets its own checklist.
- Start work on print version (optional)
- That also gets its own checklist.
|
You may have noticed some of these steps sound more fun than others. And which ones you think seem fun could be entirely different from the ones I find fun. Tackle the fun ones first — save the fun ones as a reward — whatever works for you.
One thing to keep in mind is that any of the items on the checklist can be outsourced. Hire someone to do the things you really don’t want to do, or don’t feel very qualified to do well. If you don’t have a background in graphic design, then I highly encourage you to hire someone to design the cover for you. You can get a good one for $20-$30. It’s also probably a good idea to get someone to copyedit your book. Take a look at Fiverr to get an idea of which parts of the process people are willing to do for you. Or if you know people with a particular skill, maybe you can barter for it, or buy them pizza. If you can find a partner to do half the work, and you have complementary skill sets, even better!
Cross things off as you go, and you’ll see you’re really making progress, even if you don’t have anything to “show” for it yet.
You May Also Want to Read…
“Is Amazon’s KDP Select Worth It?”
by Juliet Rich It’s pretty easy to leave a review on Amazon, but some people have never done it before. If you’re one of those people, here’s a quick tutorial on how to do it.
Before You Get Started
You will need an account with Amazon. It’s free to create one. You don’t need to tie it to a credit card.
I was surprised to see this question asked in the comments section of a blog. “I received this book as a gift, can I still review it on Amazon?” Absolutely you can. You don’t need to have bought the book on Amazon to leave a review of it there. Maybe you bought it elsewhere, maybe it was a gift, maybe you borrowed it from the library. It doesn’t matter. If you read it, you can certainly review it. And I encourage you to!
How to Leave a Review
Step 1
Find your way to the book you want to review. The fastest way is probably to type the title into the search bar.
If you scroll down the page to the customer reviews, you’ll see this:
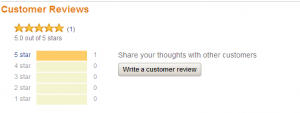
Just click the button that says “Write a customer review”.
If instead, at the top of the page, you clicked “customer reviews” near the star rating, you’ll be taken to a new page with a button that looks like this:
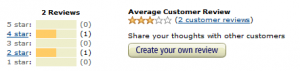
In that case, click the button that says “Create your own review”.
Step 2
In either case, you’ll be taken to the screen where you can write your review. It looks like this:
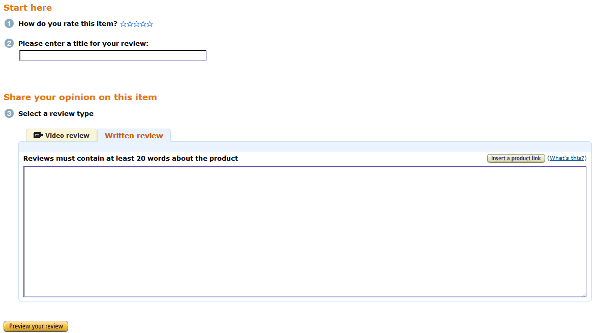
* Select how many stars you want to give the review.
* Give your review a title. You might say ‘Best book ever!’ or ‘I didn’t like the characters’ or whatever sums up your impression of the book. Or just, whatever you want. It’s your title, right?
* Write your review. You have to use at least 20 words. Sometimes it can be difficult to come up with 20 words. Other times it’s really easy. It depends on how much you have to say about the book, really. If you’re stuck for things to say, you could comment on the cover, or theorize what sort of audience would get the most out of the book. Is it really good for novices, but a little simplistic for those with more advanced knowledge? Great for kids, but repetitive for adults? You could also read other reviews to get an idea. Do you agree with them? Disagree? Go wild.
* Click ‘Preview your review’. It will tell you if you didn’t fill in everything, or if you haven’t used 20 words. Otherwise it will let you.. preview what your review will look like.
Step 3
Check out your review. Does everything look good?

Then click that ‘Publish review’ button!
You’re All Done!
Your review might not post immediately, but if you come back later, you should see it there.
Congratulations! Your review is now helping readers make a more informed decision. And in most cases, you’re also helping the author to sell more books. Win-win all around!
You May Also Want to Read…
Amazon’s Customer Review Guidelines FAQ
by Juliet Rich Are you having trouble getting your favicon to show up in WordPress using Atahualpa? Read on for my trials and tribulations! Or just use one of these two solutions:
Solution #1 – Just stick a file called favicon.ico in the root directory of your website, above the wp-content/ folder.
Solution #2 – Put your file called whateveryouwant.ico in wp-content/ata-images/ and then go to Appearance->Atahualpa Theme Options->Add a Favicon and tell it what name you want. (IGNORE what it says in there about where to put the file. It’s lying to you. Check out Atahualpa Theme Options->Image Locations to see why.)
Solution #1.5 and #2.5 – If you’ve done one of the above and it’s still not working, try clearing your cache, or restarting your browser. Be firm with it! Browsers are often quite reluctant to do it, even after you tell them to.
Keep reading for details on how I arrived at my solutions.
This site is currently running under the Atahualpa theme, Atahualpa 3.7.12 . I ran into trouble trying to get my own favicon to work. I had grabbed an .ico favicon from a website and colorized it to purple the way I wanted it. Turns out that was the easy and fast part. The hard part was getting it to show up and act like a favicon.
When you go into Appearance->Atahualpa Theme Options->Add a Favicon, it tells you where to put the favicon, and prompts you for the name of it. So I typed in ‘purplebook.ico‘ and went about ftping my favicon over to the folder it said /wp-content/themes/atahualpa/favicon/. Well, that didn’t work. I thought maybe my file wasn’t correct, but it did show up in as a little thumbnail in the Windows folder, and I could navigate directly to it in my browser and see it. So it was there, and it was seemingly in a happy format.
This is when I turned to Google to try to start solving the problem.
* I checked the root folder of my account and there was a favicon.ico and a favicon.gif, both 0 bytes. I deleted the first one. No luck. So I deleted the second one as well. Still no luck. I checked around to see if any others were hiding.
* Someone said any SEO plugin might interfere, and I do have All in One SEO Pack installed. But there doesn’t seem to be any favicon settings in there.
* I checked the source code (usually a right-click->view page source). The code for it was right at the top, but I also did a search for ‘.ico’ to see if any other references to a favicon were hiding. There I discovered that it was looking for the favicon in /wp-content/ata-images/. What the heck is that? That folder doesn’t even exist!
* It turns out that another option in Atahualpa, marked NEW, is Image Locations. So my choice at this point seemed to be to change the image location settings, or to create an ata-images folder and stick my favicon in there. I did that. Still no luck!
* I then checked that the HTML code was correct, because I wasn’t trusting Atahualpa at this point! But it’s right: link rel=”shortcut icon” href=”[url]”
* Going back to the theory that the All in One SEO Pack was the problem, I disabled it. Still a no-go.
* All the while, I had been checking it in four different browsers (Chrome, Firefox, IE, and Maxthon — though I’m not sure Maxthon even uses favicons). I thought, surely it can’t be a cache problem. I cleared the cache in Firefox and it didn’t work. But in a fit of desperation, I closed and restarted Firefox (it’s set to automatically clear the cache when I do that), and voilà. :P It works.
* Just as I was about to give up and default to the way I knew it would work, which is to stick a file called favicon.ico in the root directory of the web account. I’m telling ya, Atahualpa, next website I set up, I’m just going to do that!
Bonus: How to clear your cache in Firefox — Tools->Options->Advanced->Network->Cached Web Content->Clear Now.
How to clear your cache in Chrome — Chrome Menu (the icon with 3 bars in the top right)->Tools->Clear Browsing Data.
by Juliet Rich 
What is KDP Select?
After you’ve published your ebook via Amazon, you’ll have the option to enroll it in KDP Select. Basically, in exchange for granting Amazon exclusive ebook rights for 3 months (or more), you get additional benefits.
What does exclusive mean?
It means you won’t make the ebook available for sale anywhere else. The only place to get it is through Amazon. That means if you’ve already published it through Smashwords or you’ve made it available on your own website or blog, you have to remove it before you enroll. They’ll check.
Again, this is only for 3 months. So if it’s not working out like you’d hoped, you can remove it from KDP Select and sell it through whatever other methods you’d like.
What’s the benefit of enrolling in KDP Select?
* You get 70% royalty on more non-US sales, rather than 35%.
* You can offer EITHER a free promotion for a short period of time (“Free Book Promotion”) OR a discount promotion for a short period of time (“Kindle Countdown Deals”).
* Your book is available in the “Kindle Lending Library”. Amazon Prime members who own a Kindle can borrow your book for free. In exchange, you get a share of the collective pot. So it’s free to readers, but you will get paid.
So is it worth it?
Only you can decide that. It may make sense for your book(s), or it may not. It might make sense for one of your books, but not another. I can say that since it’s only 3 months at a time, you can always try it out and see what happens.
For my first book, it made sense to me. I published it first on Smashwords and then on Amazon. I hadn’t made any sales on Smashwords. So it really wasn’t a hardship to give Amazon exclusivity. I made use of the free promotion period which resulted in a lot of downloads. I believe this free promotion period also netted me my first review. I also saw a slight uptick in sales after the free promotion.
As for the Lending Library, I received $2.26 for a borrowed book. My regular 70% royalty payment is $2.06. The Lending Library payment can fluxuate, but it certainly made sense in this case.
As of this writing, the Kindle Countdown Deals is new, so I can’t yet share with you any results from that.
Amazon’s KDP Select FAQ
by Juliet Rich My own personal cover reveal. Here’s the cover to my next book, which I hope to have up on Amazon soon.
Disclaimer: I reserve the right to tweak it further. :)
|
About I created this site to help others write, publish, and sell their ebooks. With a background in IT, library science, and writing, it all seems to fit perfectly in my wheelhouse. I share tips, tricks, pitfalls, failures, and successes. Come join me on the journey.
Buy My Books on Amazon

Kindle:$3.99 $2.99 USD
Print: $9.99 USD
|